Any wall not built on a solid surface must have a firm and level foundation. Standard wall foundations consist of a layer of concrete on a bed of hardcore, but if the ground is particularly firm, you can get away with just a thick bed of concrete. A wall can be built directly onto a patio as long as the slabs are set on a full bed of concrete.
In this article, we will look at the correct way to lay strip foundations for a wall.
Measuring and Marking Out Foundations
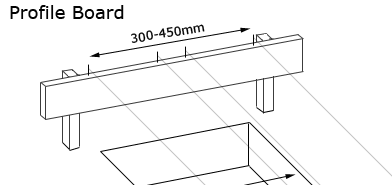
Work out where you want your wall to be and set up some profile boards (see diagram below) and string lines to mark your edges. This will help you keep the foundations and the wall straight. If planning a half-brick wall, your concrete foundations need to be at least 300mm wide and 150mm deep. With a one-brick wall, increase the width to 450mm and depth to 225mm. Set the outer strings of the profile board accordingly.

Note: Walls over 1m high will need deeper foundations due to the heavier load. 300mm deep is a good minimum for a wall up to about 2 metres high. If your wall will have brick piers, the foundation for these should also be deeper.
Using the outer strings on the profile board as a guide, dig out 50mm of topsoil along the length of the foundation.
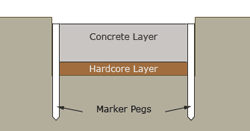
You now need to get some lengths of 25x25mm timber to use as marker pegs. Cut these to about 450mm in length. Make an easily visible mark on each peg at 150mm and another mark at 200mm down from the top.
These marks will show you how deep your concrete and hardcore layers need to be so increase them accordingly if building a one-brick wall or a higher wall.
Hammer the first peg in at the edge of the foundation strip, with the marks facing inwards, until it is about 25mm below the level of the surrounding lawn or earth. Hammer the next peg in about 1m further along and use a spirit level to get it level with the first peg.
Continue along the foundation strip in this way until you have marker pegs at 1m intervals along both sides. Keep checking the levels of the tops of the pegs (both along the strip and across it) as you go.
Digging the Foundation Trench
You can now start to dig out the foundation strip between the pegs, using the marks on the pegs to find the depth.
Once you have a trench the full length of the strip, at the required depth (200mm from the top of the marker pegs in this case), lay down a 50mm layer of hardcore and pack it down firmly until it is reasonably level.
Cover this with a thin layer of sharp sand to fill any gaps (known as a Blinding).
Laying the Concrete

Mix up your concrete, either by hand for small areas or with a mixer, and shovel it into the trench. Spread the concrete out evenly using a rake and make sure it fills all the corners and edges of the trench up to the height of the top of the marker pegs. You can use a length of wood with a straight edge to tamp it down and expel any air bubbles. You can then pull the marker pegs out and fill any gaps with concrete.
Leave it to set for a couple of hours and then cover the concrete with polythene or an old tarp and leave it to set for at least three days before you start to build on it. This will stop the effects of rain on the setting concrete, but may not stop frost from cracking the foundation. If you think there is a chance of frost, delay putting down your foundation until the weather is warmer.


