
A guide to replacing kitchen cupboard doors. One of the easiest ways to give your kitchen a relatively cheap makeover is to replace the doors of the units. The doors are nearly always the part of the unit that takes the most damage, so replacing them really will make a big difference to how the kitchen looks.
Most kitchen units are of a standard size, so finding replacements should be easy for most. There are, however, some ex-local authority houses that have kitchen units of strange dimensions, making finding replacement doors difficult.
Removing the Old Doors
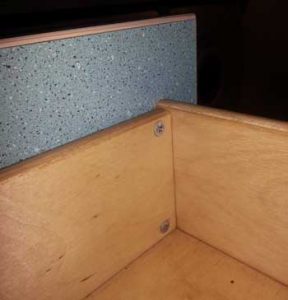
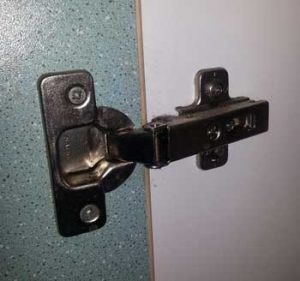 The first thing to do is to remove the old doors and to check the units are in good shape. Assuming the units are in good condition and you are happy to continue using them, you can unscrew the door hinges, leaving the screw plates attached to the inside of the unit.
These are pretty much universal for kitchen cupboards, so don’t need to be removed unless they are loose. You may need to move them when you try to fit the new doors, but for now they can stay in place.
Remove the hinges from the old doors as these can be reused. If the hinges are in a bad condition, you can buy replacements fairly cheaply online or from a local DIY store.
Preparing the New Doors
Many new replacement doors will have hinge holes already cut in them (the large round holes that the hinge recess sits in). Second hand replacement doors almost certainly will. If your new doors don’t have hinge holes cut, you can buy a circular hinge cutter attachment for your drill. Just be careful to measure and mark the position of the holes carefully or you may have problems getting the doors to sit properly.
Assuming your replacement doors have a hinge hole, fit the old hinges you took off the old doors and screw them in place using the same screws. As long as the hinge plates don’t need to be moved, you are now ready to fit the doors.
Fitting the Replacement Doors
Hold the new door up to the hinge plates on the unit and attach the top hinge using the large central screw. The second screw is used to adjust the door alignment once it is hung. Repeat for the bottom hinge.
If the door has hole pre-drilled for the handles, attach these now. If there is no hole, drill one using the appropriate sized drill bit. To avoid damage to the inside of the door, place a block of wood behind where the hole will be and hold it in place with a clamp. When you drill through, this will prevent the inner face splitting or tearing. With the hole drilled, you can attach the door handle. If the threaded bolt is a bit short, you can countersink the hole on the inside of the door to provide some extra thread.
Adjusting Cupboard Doors
There are three possible ways to adjust kitchen cupboard doors. Each of these adjustments can be made with a cross head screwdriver.
- The first is the large central screw that attaches the hinge to the hinge plate. This is used to slide the hinge back and forwards, to stop the door rubbing on the cabinet when it closes. Simply loosen the screw slightly, slide the hinge outwards and then tighten the screw.
- The second area of adjustment is made by tightening or loosening the smaller screw on the hinge plate, next to the larger central screw. This adjusts the door to the left or right, as you look at it with the door closed. This allows you to centralise and level the tops of adjoining doors.
- The third way to adjust the door position is the hinge plate itself. The screw holes in the hinge plate are slots, allowing you to loosen the screws and slide the plate up and down slightly. This means you can lower or raise the door and line it up with the bottom of the drawer or the adjoining door.
Replacing Drawer Fronts
 If you are changing the doors, you will also need to change the drawer fronts. Kitchen drawers are normally constructed with the drawer front screwed to the body of the drawer.
To replace the drawer fronts, all you need to do is undo the two retaining screws which are accessible from the inside of the drawer. Attach the drawer handles to the new drawer fronts by drilling through the centre of the drawer front and then countersinking the hole at the back. This will allow the drawer front to sit flush against the body of the drawer.
Screw the new front onto the drawer using the same screws and screw holes that held the original drawer front.
[amazon_link asins=’B06Y6BGPB3,B06Y45Q3C3,B00BFFHWVY’ template=’ProductCarousel’ store=’subscribeands-21′ marketplace=’UK’ link_id=’62e24f66-943b-11e8-8ad0-a5c23af6ead9′]


