There are several situations that may require you to cut a doorway in an existing stud partition wall. You may have split a large room into two smaller rooms and need to give access to one (or both) of them. Perhaps you want to create direct access from a bedroom to the bathroom. Creating a new opening in a stud wall may sound like a massive task, but as long as you plan carefully and follow a few simple rules, it really should be fairly straightforward.
Is it Load-bearing? – Most partition walls are not load-bearing, but it is worth making sure just in case. Some stud frames are used to give additional support to roof trusses. If this is the case, you will need to make sure that cutting the doorway will not affect this. If you are unsure, seek advice from you local planning officer or building inspector.
Preparation
No matter how carefully you work, this will be a messy job. Any furniture in the room should be moved out of the way (out of the room if possible) and covered to protect it from dust. Roll back carpets if possible, and protect a wooden or laminate floor with dust sheets. Pry off the skirting board, on both sides of the wall, using a pry bar or large screwdriver. Do your best not to damage the skirting board as you remove it so it can be reused later. Finally, make sure you have all of the tools you need for the job.
Tools you will need:
- Tape Measure
- Pencil
- Stud Locator (optional)
- Plasterboard Saw
- Handsaw
- Timber for Studs
- Nails (4in)
- Hammer
Locate the Stud Work
The first thing you need to do is locate the positions of the existing studs. The easiest way to do this nowadays is to buy or borrow an electronic stud finder. If possible, position the doorway so that one of the existing studs forms one side of it. Once you have located a stud in the rough area you want your doorway, mark out the width of the opening. Remember that the opening will need to be wide enough for the door and door lining to fit (if a door is being fitted into the opening).
If you want to go the extra mile, add the width of a stud to either side of the opening you mark. This will allow you to fit additional framing studs around the door to give it extra strength (these are sometimes called Jack or Trim studs.)
Cutting the Plasterboard
Following your marks, cut the plasterboard or lath and plaster out of your opening using either a sharp bolster chisel for laths, or a sharp trimming knife or plasterboard saw for plasterboard. Do this on both sides of the wall. You should now have a rectangular opening, reaching up to the ceiling plate, with the edge of a stud marking one side. The opposite side of the opening will not usually match up to the stud work (there will probably be a stud in the middle of your doorway), so you need to add one here.
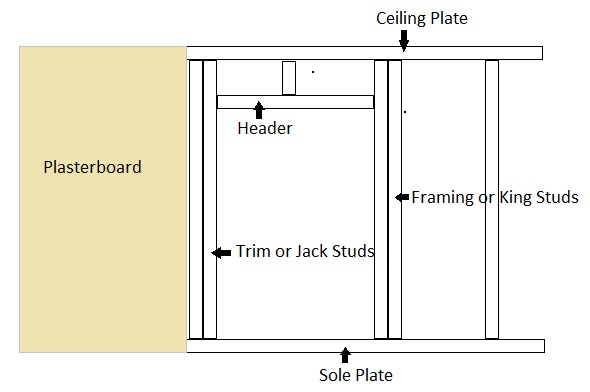
Adding New Studs
On the opposite side of the opening to the side with the stud, measure and cut a new stud to fit. These two studs form the basic vertical frame of the doorway. They are sometimes called King studs.
If you planned to add Jack or Trim studs as mentioned above, measure and cut them now. These two studs will go tight up against the inside of the two framing (king) studs, effectively creating a double thickness stud on either side of the opening.
Check the height of the door and door lining, and mark this height on the new studs you have fitted. Remember to measure from the floor level rather than from the sole plate (the timber stud fixed to the floor that creates the bottom of the stud frame). Using this mark as a guide, cut and fit a horizontal header stud for the doorway.
Cut and fit a short stud to fit between the door header and the ceiling plate if possible. This will add extra stability to the frame. You can now saw through the sole plate and remove the unwanted section between your new studs. This should leave you with a perfectly framed doorway.
Fitting the Door and Lining
Measure and cut strips of plasterboard to fit from the cut edge of the existing plasterboard to the inside edge of your new opening, and then fit them into place. Based on the thickness of the wall, choose and cut your lining material to line the inside of the new opening. Now cut and fit your architrave (with mitred corners). Replace the skirting on either side of the new opening and complete the finishing off (sealing the joints in the plasterboard, etc).


