Being able to make the correct concrete mix and knowing how to mix mortar are essential skills for any ardent DIY-er. Concrete and mortar Mix ratios vary depending on the project you are working on. Concrete is used in many places around the home, for laying a firm sub-floor or a base for paving, whilst Mortar is the most important bit in any wall.
Both Mortar and Concrete are made with a mix of sand and cement, with Concrete also containing coarse aggregate (small stones) for extra strength. This guide will explain the components of concrete and mortar, how to choose the right mix ratio and how to keep concrete looking good for years after it is laid.
What is Concrete?
Concrete is the most commonly used building material in the world and has been around for a couple of thousand years at least. If you are a keen DIY-er, it is more than likely that you have mixed and used concrete yourself. It is seen as an easy-to-use construction material for everything from walls to driveways, but what is concrete?
Concrete is defined as a composite construction material, being made up of several different components. Modern concrete is most often made using a mix of water, Portland Cement, sand, and aggregate in the form of small stones or crushed rocks. Additives to increase or decrease setting times or to help reduce the damage from frost are often also added to the mix.
Without any one of the main four components, concrete is not really concrete. Portland Cement may be partially replaced by another cementitious material such as Fly Ash (a by-product of coal-fired electricity generation), various types of sand can be used, and aggregates can be a variety of materials and sizes, but the four components remain essentially the same. The one element which doesn’t change is water, although the amount used does.
What is Concrete Used For?
Concrete can be used in a huge number of different situations and, depending on the mix and the additives can result in dozens of different finishes. You may find concrete holding fence posts in place, forming floors and walls of houses, acting as a solid foundation where no natural foundation occurs, and even being used as a kitchen work surface.
The intended use for the concrete heavily influences how it is mixed. Different concrete mixes are used for different projects, but the most common mix for most DIY projects will probably be 1:2:3 or 1 part cement, 2 parts sand, and 3 parts aggregate.
Some of the uses for Concrete: Roads (US more than the UK), pipes, house foundations, walls, floors, concrete driveways, paths, paving slabs, bridges, footings for fences, kitchen counters, and much more.
Components of Concrete
As mentioned earlier, the basic components of a concrete mix do not change. Concrete always contains Water, Cement (or cementitious material), Sand, and Aggregate, but might also contain a number of other additives, either chemical additives or mineral additives.
Cement – Portland Cement is the key to making concrete as it is the cement reacting chemically with the water which binds the mix together (this process is called hydration). There are other types of cement available, but Portland Cement is by far the most common, particularly for a DIY project. Cement is made from a combination of calcium, silicon, and aluminium oxides. Cement is highly caustic and wet cement can quickly cause burns to the skin if not washed off quickly.
Sand – Sand acts as a fine aggregate in concrete and usually forms the bulk of the mix along with the coarse aggregate. The sand used for mixing concrete will often, if not always, be referred to as Sharp Sand or Builders Sand. In certain circumstances, some of the sand will be replaced by a decorative additive such as crushed glass.
Course Aggregate – Traditionally this would be natural gravel or crushed stone, but increasingly recycled aggregates from construction or demolition are being used, at least partially. The course aggregate forms the bulk of most concrete mixes and makes the resulting concrete much stronger than it would ever be without it. Aggregates form the bulk, whilst the cement fills all the gaps and binds it together.
Water – Without water, concrete would just be a pile of stones and dust. Water is the essential element that causes the cement to react and solidify. The amount of water you add to the mix will greatly affect how you work with the concrete and the final result. Add more water to the mix for a more free-flowing concrete (ideal for filling formwork), and include less water for a stronger, more durable final product.
Cement
The standard type of cement, the type you will most likely use for general DIY tasks, is OPC or Ordinary Portland Cement. OPC is air setting, meaning that the moisture in the air will cause it to harden if not sealed in bags. It is grey and usually available in 50kg bags. Although there are several other types of cement available, the other two main types you are most likely to come across are White Portland Cement and Masonry Cement.
White cement is used in areas where the finished appearance is important. Masonry cement has additives to increase its usability in both mortar and render mixes. If you need to mix large amounts of cement/concrete, it may be worth buying or hiring a cement mixer.
Cement Safety
Cement is highly alkaline and the setting process is exothermic (it produces heat as it sets). This means that wet cement can cause painful “cement burns” if it gets in contact with your skin for even a short period of time. Dry cement powder can also be dangerous if it gets into your eyes or throat. Always wear gloves when handling cement, and take care when mixing or applying it.
Your DIY Safety Kit should, at the very least, Include Gloves, Goggles, and a Mask.![]()
Aggregates
Aggregates are used to give body and strength to a concrete or mortar mix. Coarse aggregate is small stones, usually less than 20 mm in diameter, and fine aggregate is basically sand. Sharp Sand (which has larger grains) is used for concreting or laying paving slabs and Soft Sand is used for bricklaying, etc. It is also possible to buy mixed aggregate containing both coarse and fine aggregates.
In general, the aggregate component of a concrete or mortar mix is usually several times that of the cement component. For example, a simple sand and cement mix should be at least 3 part sand (the aggregate) to one part cement. A strong concrete mix would be something like 1:3:5 (Cement, Sand, Coarse Gravel). In this case, both the sand and gravel are the aggregate. In pre-mix concrete, the aggregate is already mixed with the cement.
Aggregates have been used in construction for thousands of years but it was the Romans who refined and, to some extent, perfected the process.
Get over 16000 woodworking plans. Learn how to build anything from furniture to birdhouses out of wood. Clear and detailed plans that guide you through the process of each project step-by-step.
Ready-Mix Concrete
 Mixing your own concrete or mortar with separate bags of cement and aggregates is often the cheaper option, but if you only have a small job to do, you can buy bags of ready-mix or Pre-Mixed Concrete and mortar. Pre-mixed cement and mortar simply need water added to them in the correct quantities.
For bigger jobs, you can also buy wet pre-mixed concrete and get it delivered. However, you need to make sure you have enough helping hands to get the wet concrete in place before it sets.
Additives
There are several things that can be added to a mortar or concrete mix. It is possible to get pigments to change the colour of both mixes, but these need to be used with care. Most pigments will affect the usability of the mix, and you might need to think about adding lime or plasticizer to balance this.
How Much Sand and Cement Do I Need? – Concrete and Mortar Mixes
There are several different mixes you can employ. The proportions of each individual element you add are dependent on the job at hand. A strong concrete mix is one with a higher percentage of cement, whilst a weak mix uses less. When talking about “parts”, as in 1 part cement, 2 parts sand, we simply mean equal amounts. A part could be one shovel full, one bucket full, or one tonne of the material. How big the parts you use are, depends on how much concrete or mortar you need to make.
Concrete Mixes
General Purpose Concrete – 1:2:3 mix
Ideal for most uses except foundations and exposed paving. It is composed of one part cement, two parts sand, and three parts coarse aggregate. If using combined aggregate, this mix would be 1:4, one part cement to four parts combined aggregate.
Foundation Concrete – 1:2 ½:3 ½ mix
Ideal for wall foundations or bases and laying paving slabs, etc. One part cement, two and a half sand, and three and a half coarse aggregate. If using combined aggregate, this mix would be 1:5.
Paving Concrete – 1:1 ½:2 ½ mix
Used for exposed paving such as driveways and garage floors. One part cement, one and a half parts sand, and two and a half parts coarse aggregate. If using Combined aggregate, you would need a mix of 1:3 ½.
Mortar Mixes
Standard Mortar 1:5 mix
Used for internal or sheltered bricklaying. Mix one part cement with 5 parts soft sand. Add a small amount of lime or one part plasticizer to increase the workability. This type of mortar mix is perfect for use in an internal block partition wall.
Strong Mortar 1:4 mix
Used for exposed brickwork. Mix one part cement with 4 parts soft sand. Again, add a small amount of lime or plasticizer to increase the workability.
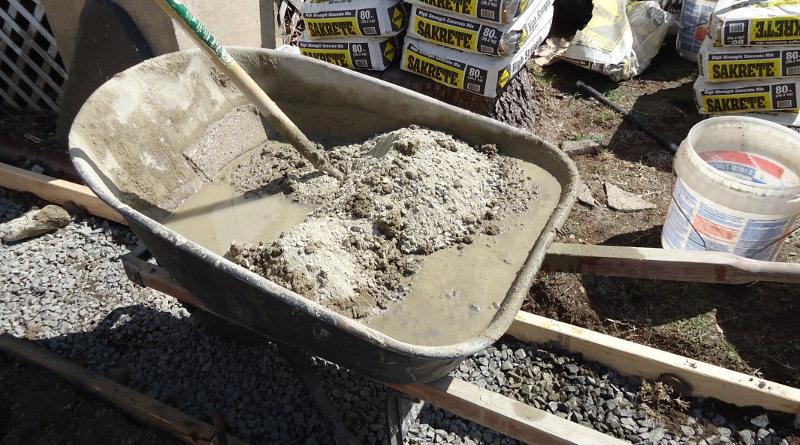
Mixing Concrete and Mortar
Now that you know how much sand and cement you need, you are ready to start actually mixing the concrete.
It is always best to mix concrete or mortar on a piece of board (spot board). This helps to keep the mix free from stones or dirt on the floor, and also avoids leaving a concrete stain. Start by mixing the separate components thoroughly whilst dry. This applies to pre-mix as well.
Once the mix looks uniform in colour, make a small well in the middle of the mix and slowly add water. Work the mix in from the edges until the first bit of water is absorbed. Now make a new well and repeat the process. Continue doing this until you have a uniform mix. If you draw your spade across the mix and it leaves a smooth finish with no water seeping out, the mix is just about right.
Concrete Curing Tips
Concrete can take a very long time to completely dry out (Cure), particularly if it is laid thickly. It is important that the curing process is not too fast (or too slow) if you want the best results. Ideally, curing should continue for at least 7 days during the summer and 10 days in winter.
Moisture Loss – You should cover wet concrete with a polythene sheet as soon as it is laid and level. This will help to stop moisture from evaporating too quickly.
Cold Temperatures – Concrete should not be laid in very cold conditions. If you lay concrete and think that the overnight temperature will be below freezing, you should create an air gap between the polythene sheet and the concrete surface using battens of wood. The air gap will help to insulate it from the cold.
More Concrete/Cement Guides:
Maintaining Concrete Surfaces
There are very few houses in the UK which do not include some concrete in their construction or in the garden. Concrete, as with any other building material, will suffer from the effects of dampness and weather if it has not been treated properly (and sometimes even when it has).
Cleaning Concrete
Concrete on driveways or the floors of garages often gets stained with oil and grease. Soak up fresh spills straight away and sprinkle dry sand over the top to absorb as much of the liquid as possible. Sweep the sand away after a day or two and then wash out the stain with white spirit or a degreasing solution.
Sealing concrete
 Newly laid concrete has a very high alkali content and efflorescence can form on the surface as it dries. Let the concrete dry completely before attempting to apply any sort of surface finish. Concrete dries very slowly, indeed, in perfect conditions 4″ of concrete could take 4 months to completely dry. Remove any efflorescence as you would with brickwork and then treat the surface with a clear sealant solution or general-purpose primer.
Dusty Concrete
If the surface of the concrete is over-trowelled as it is laid, a dusty and loose layer can form on top of it as the cement is drawn out. In the event that this happens, you should let the concrete dry and then treat it with two coats of a PVA bonding agent (1 part PVA to 5 parts water). The same solution can be used to prime any very porous concrete surface.
Repairing Cracks or Holes
Clean out the crack with a stiff brush to remove any debris. A very thin crack (5mm or less) should be opened up slightly with a chisel so that any filling will hold. If you can, undercut the edges to form a lip that will help to hold any filler. Primer the inside of the crack with a bonding agent, diluted as instructed by the product manufacturer. When this is dry, apply the appropriate filler (depending on whether the crack is outside or inside the house). If you are filling a larger hole, mix up a standard concrete mix using a fine aggregate. Brush out and prepare the hole as you would with a crack, and then fill with the concrete mix.
Spalled Concrete
External concrete is prone to spalling. This happens when moisture invades the surface of the concrete and then freezes. As the frozen water expands it can cause the surface of the concrete to break away. If the concrete contains steel reinforcement, this effect can be accelerated as the exposed steel corrodes. You can fill the hole or crack in the same way as described above, but you will need to treat any exposed metal with a primer to stop the corrosion from continuing. To prevent further spalling, treat the concrete with a bitumen undercoat and then paint over it with a reinforced emulsion.
DIY Tools, Materials and Equipment


