There may be one of several reasons why you would want to remove your fireplace, from simply wanting to replace it with another to just wanting to get rid of a fireplace altogether to update the look of the room.
Whatever your reason, this is a fairly easy job, albeit a rather messy and possibly tiring one. One of the most important things to remember is that you may dislodge years of built-up soot and debris from the chimney flue which can create a real mess if you are not prepared for it. Move any furniture as far away as possible, roll back the carpet if you can, and cover everything in the room with dust sheets. It is also a good idea to sweep the chimney (or have it swept) if the fireplace has been used recently.
Safety First
If you are removing a fireplace constructed from brick or which is tiled, make sure that you wear safety goggles and some sturdy gloves at all times. A dust mask is also a good idea. You will need to use a bolster chisel to break the hearth away, so make sure it is fitted with a hand guard.
Removing the Hearth
In most cases the hearth will have been laid after the fire surround, so you should start by removing this first. You should obviously check that this is the case before you start. Assuming it is, use a bolster chisel and club hammer to break the bond between the brick hearth and the constructional hearth beneath (the constructional hearth will be flush with the floorboards or concrete floor). Once you start to see a crack appearing along the bottom edge of the hearth, knocking in wooden wedges can help to lever it up.
In many cases, the hearth will break away from the floor in one piece and you will be able to lift or drag it out of the way. If the hearth breaks up, assuming you did not want to reuse it, you will just have to continue to break it away from the floor in chunks.
Some hearths are little more than a layer of tiles laid on top of the constructional hearth. In this case, you simply need to lever them up using a bolster chisel to remove them.
Removing the Surround
Most fireplace surrounds will be held in place, at least partially, by metal lugs fixed around their edge. These will have been used to screw the surround to the bricks of the chimney breast and then covered over with plaster. You need to reveal the lugs before you can remove the surround, which means that you will need to chip away a thin strip of plaster all the way around the fireplace (around 25mm should be enough).
Once you have found all of the fixing lugs, you can remove the screws holding the surround to the wall. It is a good idea to prop a length of wood against the surround to stop it from toppling over when the last screw is removed. This probably won’t happen, but it is better to be safe than sorry, especially if you plan to reuse or sell the surround later.
If the screws are rusted in place, try soaking them in penetrating oil for a while. If this fails to loosen them, you will need to drill out the heads. When all of the screws are removed, and preferably with some help, you can lower the surround to the floor and remove it.
Wooden Surrounds
Wooden surrounds will usually be held in place in a similar way, using several lugs fixed around the edge. It might also be screwed directly through the sides into battens fixed to the chimney breast.
Check the surround to find wooden plugs or circles of filler that would hide screw heads. If you can find them, remove them and undo the retaining screws. If you cannot find them, you may need to chip away a strip of plaster around the surround to reveal the hidden lugs. Only do this if you cannot see a gap between the back of the surround and the plaster of the chimney breast.
Brick and Stone Surrounds
A brick or stone surround will have to be removed piece by piece using a bolster chisel and club hammer. This will be the messiest and most tiring type of surround to remove by far.
Take your time and don’t try to remove too much in one go. Work from the back of the bricks or stone to break the bond to the wall, removing one at a time if need be. You may find metal ties holding the brick or stone structure to the wall. Break away the bricks around these and then remove them either by cutting them off at the wall or working chipping away the mortar holding them and then working them loose enough to pull out.
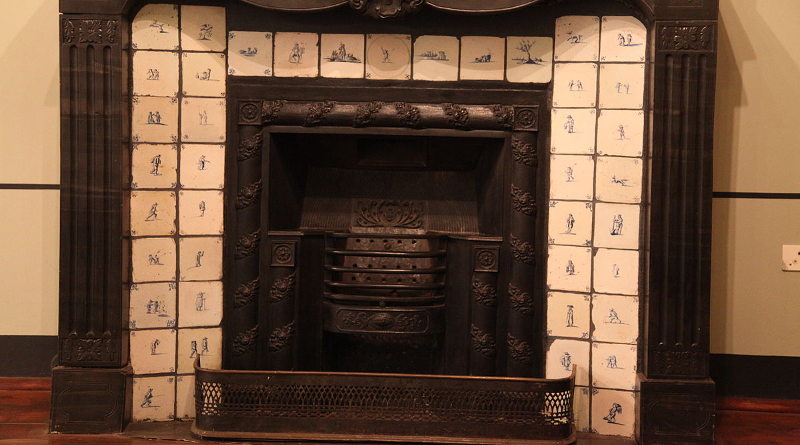
Cast Iron Surrounds
Cast Iron surrounds are usually fixed to the chimney breast using lugs located around their edges. You will need to chip away about 25mm of plaster all the way around the surround to locate the lugs, then remove the screws. If the screws are corroded, soak them with penetrating oil and then try again. If they still will not move, you will have to drill out the heads.
With all the screws removed, carefully lower the surround to the floor and move it out of the way. Period cast iron fireplace surrounds are very sought after, so if yours is in good condition and you do not want it anymore, it is well worth advertising it for sale or speaking to your local architectural salvage yard.
Removing the Fireback
With the hearth and the surround removed you should only be left with the fireback in place. If you are planning on replacing the old fireplace with a new one, and if the fireback is sound, you can leave it in place. If you plan to block up the opening, you should remove it.
The fireback will usually be made of cast concrete and will be comprised of two parts. You may simply be able to lever the fireback out, lifting the top half out first and then the bottom half. However, in some cases, you may need to break it up in situ and remove it piece by piece. Once the fireback has been removed, you should be left with a simple rectangular hole.
The Constructional Hearth
If you plan to lay carpet or laminate flooring over the constructional hearth, there is very little you need to do to it (assuming it is flush with the surrounding subfloor). If, however, you have exposed floorboards and wish to cover the constructional hearth with boards, you will need to remove at least enough of it to allow a bridging joist to be laid and for new boards to be fitted over the top. You can do this using a bolster chisel and club hammer, remembering to wear the correct safety gear. Remove enough of the hearth so that you can fit a joist across the gap, nailing it into the timber frame which will have been built around the outside of the hearth.
Sealing the Opening
With the fireplace removed you have the choice of sealing up the opening or making the hole in the chimney breast a feature. If you plan to seal the opening up, you have a couple of options as to how you do this. Whichever option you choose, you must make sure that you allow ventilation or you risk creating a problem with dampness and condensation.
Sealing the Opening with Plasterboard
The first thing you need to do is to create a timber frame, Using 50 x 50 mm timber, inside the hole, onto which the plasterboard can be attached. Nail it into the opening using masonry nails, making sure that you set it back from the front edge of the hole enough that when the plasterboard is laid against the frame, it will be flush with the surrounding plaster.
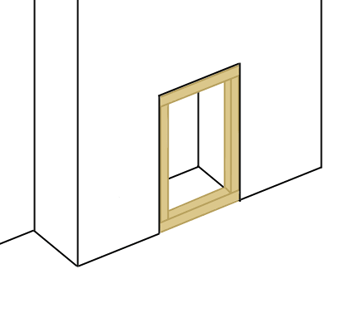
If you plan to skim the board once it is in place, attach the timber frame 3 mm further back to allow for this. If skimming, lay the board with the grey side showing. If you are planning to paper over it, lay it with the ivory side showing.
After decorating or skimming over the board, you will need to cut a hole in it to fit a plastic or metal ventilator panel. If you do not do this you risk creating a ventilation problem in the room and consequently damp or condensation problems. Your final job is to remove the lengths of skirting on either side of the hole and replace them with one long piece across the full face of the chimney breast.
Sealing the Opening With Bricks
If you wish to brick up the opening, you will first need to remove some of the bricks around the edge of the hole. Remove a brick (or half brick) from alternating courses up each side of the hole to allow the new brickwork to be toothed in. If you do not do this you will simply have a free-standing brick wall inside the hole, and this could collapse if knocked.
You also need to remember to fit an airbrick, preferably just above skirting level, to allow for ventilation. Once the hole is bricked up, you can plaster over the brickwork and decorate the wall. Finally, remove the lengths of skirting on either side of the opening and replace them with a single piece across the full face of the chimney breast.
Making the Opening a Feature
If you wish, you can leave the opening as a feature to give the room a really modern feel. If this is the case, you should plaster the inside of the hole so that it matches the surrounding wall. You can either plaster directly over the bricks by applying a scratch coat and then a skim, or you can go to the trouble of lining the hole with plasterboard and plastering over that.
In either case, you will need to fit a piece of plasterboard to the top of the hole to cover the flue hole and then fit a vent into this plasterboard to allow for ventilation.
Capping the Chimney
If you are sealing off a fireplace, you should carefully consider capping the chimney to stop rain from entering and causing damp problems. You can do this either by bedding a half-round ridge tile into cement over the chimney top (so that the ends of the ridge tile are open for ventilation) or buying a cowl designed specifically for this task.
Working on a chimney is a dangerous job, so take all possible safety precautions, or speak to a reputable builder if you are not completely sure about taking this job on yourself.
Find DIY Tools, Materials and Equipment here!


