
If you’re looking for a fast and efficient way to line a masonry wall, dot and dab may be the solution. It is one of the fastest and most cost-effective ways of affixing plasterboard to a bare block or brick wall.
However, to ensure a successful installation it’s important to follow the correct steps. This guide will take you through the dot and dab process step-by-step.
What is Dot and Dab?
Dot and dab, also known as dry lining or direct bonding, is a method of lining internal walls that involves applying adhesive dots to the masonry and pressing plasterboard onto them. This creates a strong and secure bond between the wall and the plasterboard, making it a popular choice for DIY enthusiasts and professional builders alike.
The process is relatively quick and easy, but it’s important to understand the pros and cons of using dot and dab if you want to ensure a professional finish.
Pros and Cons of the Dot and Dab Method
Like any construction method, dot and dab has its advantages and disadvantages.
One advantage is that it’s a quick and easy way to fix plasterboard to masonry walls, making it a popular choice for those on a tight schedule. You don’t have the added work of creating a stud framework (another method of dry lining a wall,) and the finished surface will often feel more solid than when plasterboard is applied to a frame.
However, one disadvantage is that it can be difficult to achieve a perfectly flat finish with the dot and dab method, as the adhesive dots can create slight bumps in the wall. Additionally, if the adhesive is not applied correctly, it can lead to problems with dampness and mould in the future.
Dot and dab is not a method that can be used with foil-backed plasterboard. The bond between the foil and the board is not strong enough, so the plasterboard could easily pull away from the adhesive.
Materials Needed for Dot and Dab Installation
Before beginning a dot and dab installation, gather all the necessary materials. At a minimum, you will need the following:
- Plasterboard Sheets
- Plasterboard Adhesive
- PVA Sealer
- Plasterers Trowel
- Spirit level
- Plasterboard Saw/Stanley Knife
- Measuring Tape
If the wall is particularly uneven, a long straight edge can help to ensure the plasterboard is installed correctly and evenly.
Step-by-Step Guide to Installing Dot and Dab Walls
Installing Dot and Dab walls is a DIY project almost anyone can attempt, and with a bit of care, achieve great results. This step-by-step guide will help you get started:
- Treat the wall with PVA sealer mixed with water to stop the bare masonry sucking the moisture out of the adhesive. Let this dry completely.
- Cut the plasterboards for the entire job before you start fixing them (including any holes for plumbing, electrics, or fixtures.) The adhesive goes off fairly quickly, so you can waste a lot if you aren’t ready to apply it straight after mixing it.
- Follow the manufacturer’s instructions to mix your chosen adhesive in a clean bucket. You can use skimming plaster, but plasterboard adhesive is easier for beginners. The mixture should be smooth and thick enough to stand on the trowel (or hawk, if you’re using one).
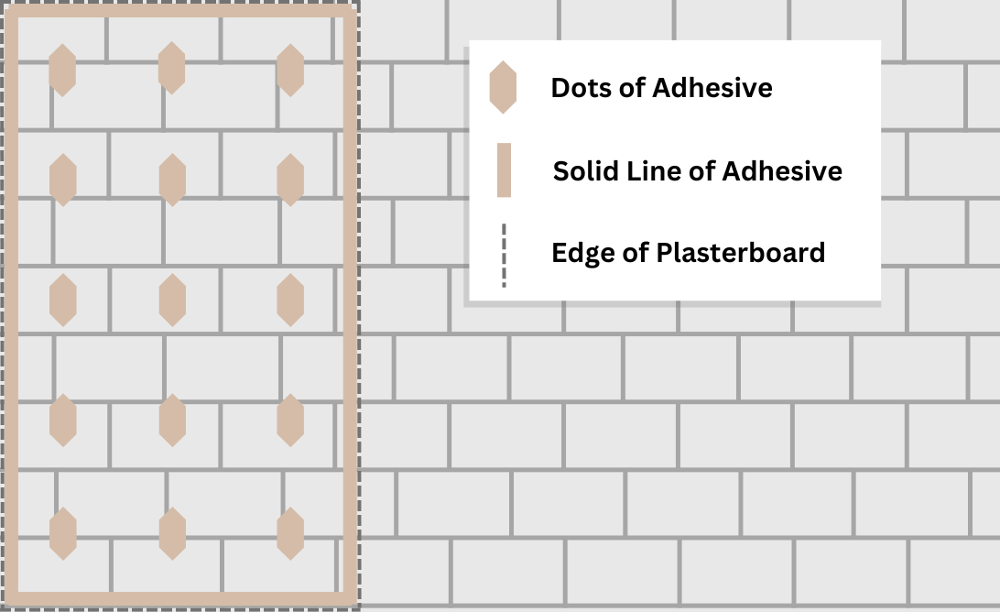
- Start to apply the adhesive to the wall in (small) fist-sized dots, spaced 20-30cm (8-12 inches) apart. Press firmly and spread the adhesive dots slightly to ensure they have adhered to the masonry, but try to keep them the same size/depth.
- If the wall is uneven, use slightly less or slightly more adhesive as needed in those places to account for the variation. We also recommend applying a solid strip of adhesive where the edges of the plasterboard will be to prevent insects from getting into the cavity.

- Hold the pre-cut plasterboard up to the wall and press it slightly into the adhesive. You should feel it grip quite easily, you don’t need to press hard. Ensure it is pressed in evenly all over.
- Use your spirit level to level the board vertically and horizontally. Check the edge of this first board is perfectly square along the edge where the next board will butt up against it. Getting the first plasterboard right will save headaches when lining up later boards.
- Repeat the process until the wall is completely lined with plasterboard. Use a straight-edge to ensure each subsequent board is level and flush with the one next to it.
You can then finish off by sealing the joints between the plasterboards, and then skimming the wall.
Tips for Successful Dot and Dab Plasterboarding
While Dot and Dab is a relatively simple process, there are a few tips to keep in mind that will help to ensure a successful installation.
- Ensure the masonry wall is clean, free from debris, and treated with a PVA mixture. This will ensure that the adhesive sticks properly.
- Different adhesives are designed for different types of plasterboard. Be sure to use the correct type of adhesive for the job.
- Take care to ensure that each piece of plasterboard is level and properly aligned with the others, as any mistakes at this stage can be difficult to correct later on.
- Make sure you leave a gap at the bottom of the wall to allow for the expansion of the plasterboard.
Dot and Dab – Frequently Asked Questions
Should You Wet the Wall Before Dot and Dab?
Many professional tradespeople will wet the surface of the masonry before applying the adhesive dots and dabs. This is to help prevent the dry blocks or bricks from sucking the moisture out of the adhesive. If you use this method, you need to apply the adhesive quite quickly, and you may find using a PVA/water mixture to be more forgiving.
Is Dot and Dab Better Than Plastering?
Unless you are trained or experienced, plastering is a hard thing to do well, and DIY-ers will probably find dry-lining easier. That said, plastering a masonry wall will usually result in a much stronger surface than applying plasterboards using the dot and dab method. And you won’t need to take an awkwardly-sized cavity into account when you fix things to the wall in the future.
Can You Skim Over Dot and Dab Walls?
Yes, you can either decorate directly on top of the bare surface of the plasterboards or apply a layer of skim plaster. In either case, it is recommended that the joints between the boards be filled with joint compound before adding the finish layer.


