It is fairly simple to construct a Partition Wall if you wish to divide a large room into two smaller rooms. Partition walls are simply a framework of timber studs over which plasterboard is laid. As this wall is not load-bearing, you can place a door or window anywhere you wish. This guide is based on building a stud wall no more than about 2400mm high. Take a look at our guide to Building a Staggered Stud Wall for details on adding in alcoves, etc.
Safety First
The first thing you need to do is to find out where the electricity cables and water pipes are in the room you wish to partition. Electronic devices for detecting pipes and cables can be bought quite cheaply and are very useful if you are not 100% sure where pipes and cabling might run. We recommend the Tacklife Digital Wall Scanner & Detector![]() , which can detect cables, pipes and even pre-existing wooden studs.
, which can detect cables, pipes and even pre-existing wooden studs.
Ceiling Plate
The ceiling plate is simply a piece of wood nailed to the ceiling, which then creates the top support for your partition wall. Cut the ceiling plate to the required length from 75mm by 50mm softwood. If the ceiling plate runs at right angles to the existing joists simply nail it directly to them. You can use a stud finder such as this 4-in-1 Stud Detector to locate existing studs and joists.
If however, the partition runs parallel to the ceiling joists you may need to lift the floorboards above to insert additional joists (noggins) into which you can nail. An easier option might be to move the partition slightly so it is directly under an existing joist. Once you have the ceiling plate fitted, use a plumb line to mark the position of the sole plate.
Get over 16000 woodworking plans. Learn how to build anything from furniture to birdhouses out of wood. Clear and detailed plans that guide you through the process of each project step-by-step.
Sole Plate
Measure and cut the sole plate from the same wood used for the ceiling plate, bearing in mind that it will not run across the foot of any doorways you are planning. Be very careful to ensure the sole plate is directly beneath the ceiling plate by using a plumb line. When you have it lined up, you need to fix it securely to the floor. If fixing to a wooden floor, use 100mm nails driven into the floor joists where ever possible. If you are fixing to a solid floor, use 90mm screws at intervals of about 600mm.

Marking Out
Starting at the end of the sole plate which is furthest from any doorways you are having in the partition, measure in from the edge by 25mm and mark the soleplate with a carpenter’s pencil. Now measure 600mm (or 450mm if using the narrower type of plasterboard) from that mark and mark again.
Continue this along the full length of the partition. It is unlikely that your partition will divide equally into 600mm sections, so when you get to the general area where you want a door or opening to be, make the mark and then add 25mm and make another mark. This is where you can cut the sole plate to allow for the door later. Marking out in this way will help to reduce the number of plasterboards you will need to trim later.
 Make sure you know how wide the door and lining are or will be, and mark this on the soleplate and then continue to mark out the 600mm centres for the studs on the other side of it. You can cut the sole plate out for the doorway later, once everything is secure and sturdy.
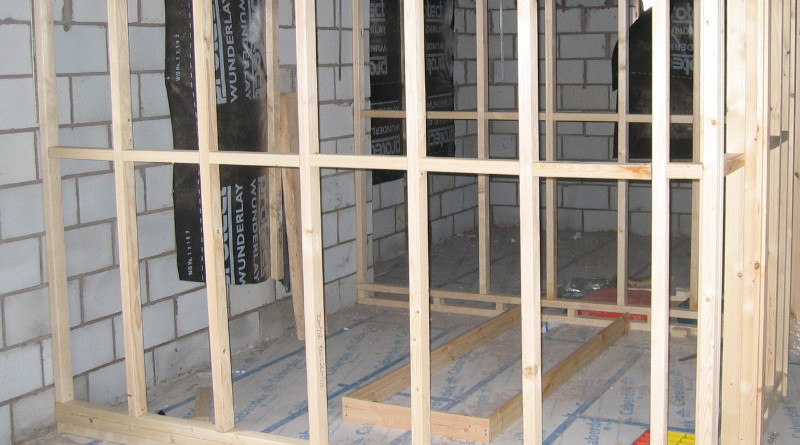
Cutting and Fitting the Studs
Measure the distance between the head and sole plate at the point where each stud will sit. Write the length each stud needs to be next to their marks on the sole plate. You really want each stud fitting between the two plates as tightly as possible, and there could be some variations in the floor and ceiling (especially in older houses).
Cut the studs and begin to fix them in place, starting at the wall. Keep this first stud as close to the wall as possible, but make sure it is upright by using a spirit level. If the wall is not true, pack out any gaps between stud and wall with small pieces of wood. Secure the end studs into the wall as well as into the sole and head plates using 100mm frame fixings or long screws with wall plugs.
 The studs should be nailed into the sole and ceiling plate securely with a technique called skewing or skew nailing. Skewing simply means driving the nail diagonally through the bottom of the stud and into the sole plate and ceiling plate. To help you do this, get the stud in position and place a small block of wood on one side of it at the bottom, hammer this into the sole plate. You can now hammer two 100mm nails through the stud at an angle without the stud slipping the other way. With two nails in place, remove the block of wood and hammer a third nail into the other side of the stud.
When fixing the studs on either side of the doorway, make sure you leave enough room for the lining and 2-3mm to give yourself some play when hanging the door later. The lining for the door, or the casing as it is sometimes known, should be the same width as the studs plus the width of the plasterboard on each side. This usually adds up to 100mm. Fit a noggin above the doorway, known as the door head, and support this with a small vertical stud in the middle of the span (unless you plan to put a pane of glass above the door to help increase light to the room). Again, make sure that the noggin is high enough to accept the door casing.
Fixing the Frame to an Existing Stud Wall
When you are fixing your new partition wall to brick or block walls, you can insert the fixings almost anywhere along the length of the outside studs (the studs that sit flat against the existing walls). If, however, you are fixing one or both ends of the new partition to an existing stud wall, you won’t have as many fixing points. If possible, line the new wall up with a stud in the existing wall using a stud detector. If this is not possible, your fixing points for the outside studs will be limited to the very top and bottom (where they will hit the head and sole plates of the existing wall). If you are lucky, there may also be a noggin in the existing wall you can fix to. Use a stud locator to check.
Finishing the Stud Frame
Once the studs are in place, you need to give the frame some extra rigidity. This is achieved by fixing several horizontal noggins between all of the studs. The noggins should be fixed halfway between floor and ceiling, but is also a good idea to put another row at around the height that shelves would normally sit. If, in the future, you should wish to fit some shelves, you won’t have to worry about getting a good fixing. If you will be fixing something like a wash basin to the wall, work out where it will go and add extra noggins there also.
The noggins can be skew nailed but it is easier to offset them slightly so you can nail directly through the stud and into the end of each noggin (see diagram above). If you need to run any electrics or plumbing through the stud frame, now is the time to work out where it will go and start to cut notches. For more information on running pipes through stud frames, have a look at our Guide to Running Pipes Through Stud Walls.
Fitting the Plasterboards
Cut the plasterboard about 2cm shorter than a height of the room and hold the board against the frame with the cut edge at the bottom. Use a wedge of wood (also called a footlifter) to lift the board against the ceiling and use galvanised plasterboard nails to fix the board to the studs. Nails should be kept about 15cm apart, hammered in along the full length of the plasterboard, both around the edges and into the stud in the middle of each board. Carefully mark around any door frames or window frames and cut the board carefully to fit. Make sure all boards fit closely together, as any gaps will make plastering the boards or disguising the joints more difficult.
Having Trouble Cutting Plasterboard? Try using a Plasterboard/Drywall Cutter.


I’ve seen stud walls with a foam or sponge. Men brain between the existing floor and the floor plate of the stud wall. Why is this and is it not always necessary?