If you are planning to partition a room it is often a good idea to create some built-in storage space. By creating a staggered stud partition you can quickly create alcoves in both side of the newly partitioned room which can be used for exactly this.
The basic rules of constructing a staggered partition are the same as when building a straight partition, however, there are some very obvious differences, including the need to deal with creating strong corners, and fixing a split sole plate.
Click here for a complete guide to Building a Stud Partition Wall, or check out our guides to Metal-framed Stud Walls, Types of Plasterboard and Plasterboard Fixings.
Staggered Stud Wall
Measure and Mark Out Wall Position
Before you begin to build the staggered stud wall, you need to mark out the position of the main partition on the floor of the room and then work out where in the run you want the alcove. With a bit of thought you can make the alcove on one side of the partition form part of the alcove on the other side, meaning less work and fewer corners to build.
Mark out the position of the back wall of the alcove, bearing in mind that if you are planning to hang clothes in the alcove that is created, you will need to allow for a depth of around 600mm. Doing this will allow you to check that the alcoves will be large enough before you actually start fixing the sole plate and head plate in place.
Fit the Sole Plate and Header Plate
 If you are happy with the size and position of your alcoves, you can now cut and fit a sole plate. The easiest way to do this is to cut it the full width of the room and fix it to the floor with nails and then cut out the section which will form the mouth of the alcove. The section you cut out will be used to form the sole plate at the back of the alcove, so take care to make straight cuts.
Cut two matching pieces of wood to form the sides of the alcove and nail these to the floor at right angles to the main sole plate. Finally nail the section you cut out of the sole plate into position between the two sides of the alcove to form the back wall.
Transfer the positions, sizes and lengths of the sole plates to the ceiling using a plumb line and create a matching head plate.
Fit the Studs

You can then start to fit the studs in the same way you would with a straight stud partition wall. Start against the wall and fix to the head and sole plates at interval of 600mm (or if using narrow plasterboards, at intervals so that there is a stud at the centre and edge of where each board will sit).
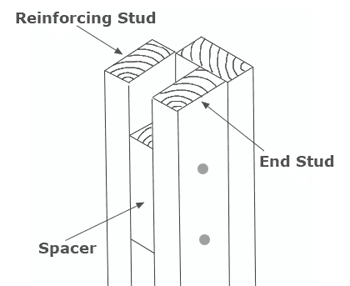
When you reach the first corner you will need to add some extra strength by adding a second stud with a spacer in between (see image). This not only adds strength to the corner, but also gives you something extra to attach the plasterboards to.
The first stud of the side wall of the alcove then attaches at the back face of this reinforced corner. Repeat this for all of the four corners of the alcove.
Continue to fix the studs for the rest of the partition until you reach the opposite wall of the room (or wherever the wall is meant to finish).


