Plastering in general is something of an acquired skill, and applying finishing plaster is almost an art. It can take a lot of practice to get consistently smooth finishes, and if you want a perfect finish, you might want to think about employing a professional for this job. This is especially true if you want to just paint the wall afterwards, and not cover it with wallpaper or tiles.
If, however, you want to apply finishing plaster yourself, there are several basic rules you can follow to help ensure the result is as good as possible. If possible, try out the techniques discussed here on a small section of wall, or even an offcut of plasterboard, before taking on a whole wall.
Applying Finishing Plaster
The technique for applying finishing plaster is the same when using plasterboard sheets, render, or undercoat plaster as a base. The surface preparation does vary, particularly with an undercoat plaster, which needs to be damp when the finishing plaster is applied.
Smoothing Plasterboard Joints
In this guide, we will be looking at applying finishing plaster over the plasterboard, and this means smoothing out the joints in the boards before starting. For this task, you can buy adhesive scrim that you just unroll and stick over the joints like tape, or you can get non-adhesive scrim, and apply it using a thin layer of prepared plaster (if you are new to this, we advise using adhesive scrim as it is much easier and quicker).
Trim off the scrim at the top and bottom of the plasterboards for a neat finish. If any of the gaps are larger than about 3-4mm, you should fill them with pre-mixed plaster instead of using scrim.
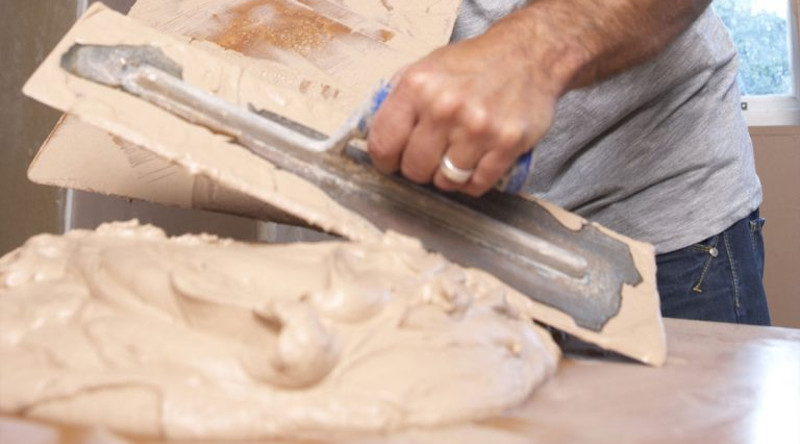
Mixing the Plaster
The plaster will begin to go off (dry out) quite quickly, so don’t mix up more than you can comfortably use within about 30 minutes. We recommend half-filling a clean bucket with tap water, and then slowly adding the dry plaster, following the manufacturer’s instructions carefully. The exact recommended amount you need will vary.
It is best to use a power stirrer to mix the plaster. This is a long mixer attachment for a power drill (you can buy them fairly cheaply). If you don’t have a power stirrer, use a clean metal or wooden rod to mix the plaster manually. It should be a very smooth mixture.
Keep adding dry plaster until the mix has a smooth, creamy consistency. Make sure that you run a trowel around the inside of the bucket to mix in all of the dry plaster. You can then tip the mix out onto a spot board (a clean sheet of wood, for example), where it should spread out easily, but not run over the edges. If it runs too easily, the mix is too thin.
Applying the Plaster
Using a plastering trowel, cut away a small section of the plaster pile and scrape it onto a plasterers hawk (only load as much as is comfortable to hold). Working from the top of the wall to the bottom, hold the front edge of the hawk against the wall, and using the trowel, push a small amount up and onto the face of the wall in as smooth a motion as possible. Spread the plaster across the surface, pressing firmly and distributing it as evenly as possible. Using broad vertical and horizontal stokes will help to get a smoother finish, although this does take some practice to get right.
Continue to use the trowel to transfer small amounts of plaster from the hawk to the wall, spreading it and smoothing it before adding more. After a while, you should be able to build up a bit of a rhythm. You need to work quite quickly, as you don’t want the plaster to dry too much before you can go back over it to further smooth the surface.
Smoothing the Plaster Surface
When the surface is covered, you need to go back over it before it fully dries, smoothing the plaster and creating an even thickness across the whole surface. It is unlikely that you will have the perfect finish right now, but that doesn’t matter as much as getting the surface even.
Let the plaster dry for at least 30 minutes, until the surface is still damp but firm enough to touch without moving the plaster or easily leaving a mark. Using a cleaned and dampened plastering trowel (dip it in a bucket of clean water), sweep the blade across the surface, smoothing the plaster and spreading any excess to fill any small indents. For best results, hold the trowel at a slight angle to the wall, so only one of the long edges is touching the surface.
The surface should be looking noticeably smoother. Now leave the plaster to dry some more, for around 30 minutes. While still damp, but firmer, repeat the smoothing process. If you need to, use a mist spray of water to slightly dampen the surface. If you are struggling to smooth right up to the edges of the wall, use a clean, damp paintbrush to smooth and neaten those areas.
If the surface is not as smooth as you would like after this stage, you can use very fine sand paper to try to fix this. You should wait until the plaster is completely dry before you do this.


