
If you a planning to do a lot of work that involves shaping wood, buying or hiring a Router can be a good investment.
A Router can not only help speed up jobs like beveling the edges of timber and cutting grooves and recesses, but can also help you to create effects which would be extremely difficult to achieve using hand tools.
As with any power tool (or any tool in general), Routers must be handled carefully and used correctly if you want to stay safe and create the best finish. This guide will take you through how to safely set up and use a handheld router.
Setting Up Your Router
1. We have said it before and we will say it again, correct preparation is half the battle with any DIY job. Setting up your Router correctly before you make the first cut is essential.
Routers usually come with a selection of different cutting bits for different tasks. Select the correct bit for the job at hand (groove cutting bits are plain, whilst edging bits usually have a metal guide wheel on them which runs along the edge of the timber you are shaping) and lay your Router on its side.
With the locking pin provided, lock the chuck and loosen it with the spanner. Slide the bit into the chuck as far as it will go and tighten the chuck back up. Now remove the locking pin and store it away safely.
2. Stand the router upright on a workbench and loosen the nut securing the depth rod. Now loosen the side handle and press the router down until the bit touches the surface of the bench.

Tighten the side handle back up and have a look at the depth gauge. You now set the depth of the cut you wish to make by adding on the required depth to the figure shown on the depth gauge.
For example, if the pointer on the depth gauge is pointing at 0 and you wish to make a 10mm deep cut in the wood, move the pointer up to 10 and tighten the nut on the depth rod.
Now loosen the side handle and let the Router rise up on the springs. You can check the depth is set correctly by making a test cut on a scrap of wood.
Cutting a Parallel Groove
1. To cut a groove parallel to the edge of the board, you will need to attach the guide fence supplied with the Router. This is attached to the sole plate using the guide plate and winged screws provided.
Mark where you want the groove to be cut on the wood and use this mark to set the position of the guide plate and guide fence. Set your required cutting depth using the method above.
2. Place the router on the end of the timber with the guide fence tight up against the edge and double-check the bit is in line with the cut mark.
Loosen the side handle, press the body of the router down to the preset cutting depth and tighten the handle back up. Start the Router and move it towards the start of the cut mark, making sure that the guide fence is flat and tight against the edge.
Slowly start to cut the groove, applying steady pressure to the Router. Continue all the way along the length of the required groove, letting the bit run off the end of the board if you require the groove to be the full length of the edge.
3. If you need to cut a parallel groove further away from the edge than the guide fence will allow, you will need to create your own cutting guide.
Mark where you want your groove and position the router in line with the mark, with the bit directly over the cut mark. Place a straight length of wood against the side of the sole plate and clamp it into position.
This is now your guide, so make sure that the edge of the sole plate is flat and tight against it as you make your cut.
Profiling Edges with a Router
1. When profiling edges, you need to follow a few simple rules. Router cutters rotate anti-clockwise when looking from above the Router. This means that for the bit to cut properly, the cutter needs to be fed onto the wood from right to left.
The blade will be turning into the wood rather than away from it and will help to avoid the Router being wrenched out of your grip.
 2. Select whichever cutter bit will give you the required profile and fit it into the Router.
Set the depth as detailed above and clamp the work piece securely to your bench. Make sure that the clamps will not get in the way of the Router as it passes along the edge.
With the sole plate resting on the face of the wood, start the Router and press the body down on its springs to the preset depth. Move the blade sideways into the edge of the wood and begin cutting your edge profile.
The guide roller on the bit will stop the bit cutting any further into the edge than required. Start to move the Router along the edge, keeping the sole plate flat on the face of the wood and the guide wheel tight against the edge.
 Router Bits
 Router Bits
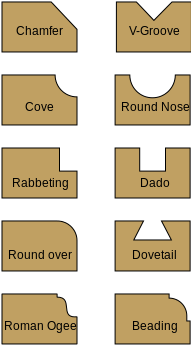
You will almost certainly get at least a couple of different Bits with your Router, but it is worth buying a larger selection if you intend to do a lot of wood shaping work.
You can buy a wide selection of different Bits either individually or in sets of 10 or more.
Get the best Bits you can afford and make sure that you maintain them correctly, applying a little machine oil from time to time and cleaning them after use.
Tool Profile – Bosch POF 1200 AE Router
– Powerful 1200 Watt motor for demanding tasks in all types of wood
– Dust extraction port – for dust-free working
– Transparent chip guard protects against flying chips
– Outstanding ergonomic design with soft-grip for convenient and safe working
– SDS system for easy insertion of the template guide
– 55mm stroke length
 A perfect mid-range Router, powerful enough and versatile enough to handle almost any DIY profiling and cutting task, whilst not costing the earth. The Bosch POF 1200 AE comes with a centring pin, template guide, straight bit, collets, spanner, parallel guide and dust extraction adaptor.
Buy The Bosch POF 1200 AE Router Here For Just £69.16


