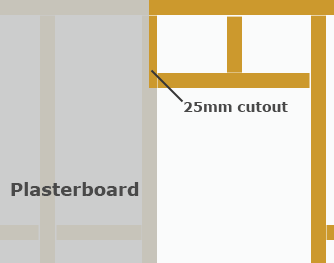
There are only really two ways to fix plasterboard to a stud wall, vertically and horizontally (although we could also add: The right way and the wrong way). The choice is really down to economics. Work out how many boards you will need if fixing vertically, then horizontally.
The fewer you need, obviously the better, although it is also worth thinking about how many cuts you will need to make as this can add time and problems to the job. Before you start fixing the plasterboards, buy or make a footlifter to help you position the boards. It is also worth marking the position of the studs on the floor, so that when the plasterboards are fixed you can find the middle studs easily.
Fixing Plasterboard Vertically
You may need to trim the boards, depending on the height of the room and the size of the boards. If you do need to trim them, cut them 20mm shorter than the height of the room. The top edge of the board will touch the ceiling and the gap at the bottom will be hidden by the skirting board.
If your room is higher than the 2400mm of the longest widely available plasterboard, you will need to either put in an extra set of noggins so that the top of the board has something to fix to. Alternatively, you can fix the plasterboards horizontally as shown below. If you do, you may still have to add or reposition the noggins.
 Start fixing the plasterboards at the doorway (if there is one), with the edge of the board flush with the face of the stud that forms the doorway. Cut a 25mm strip away from the edge flush with the doorway,starting at the underside of the doorway head member and rising to the top edge of the plasterboard.
Using 30 or 40mm plasterboard nails, fix the first board to the studs. Remember not to space the nails more than 150mm apart for the most secure fixing.
Now repeat this for the other side of the doorway, remembering to cut the 25mm strip away at the top. Measure, cut and fit a piece of board to fit above the doorway. You should now see why those 25mm strips were removed. If you did not, the piece of board above the door would have no way to fix the edges.
Once the doorway is completed, you can fix the rest of the boards, cutting to fit when you come to the walls at each end. If there is no doorway in your stud wall, start fixing the plasterboards at either end of the partition. If the wall at the end of the partition is not true, scribe the plasterboard and trim it to fit.
Get over 16000 woodworking plans. Learn how to build anything from furniture to birdhouses out of wood. Clear and detailed plans that guide you through the process of each project step-by-step.
Fixing Plasterboard Horizontally
If you decide, for either economical or practical reasons, to fix the boards horizontally, you will first need to make sure the noggins running through the middle of the stud wall will align with the edge of a sheet of plasterboard. Measure the width of your plasterboard sheets, then measure down from the ceiling to see if they are correctly positioned. Assuming they are, you can start fixing your boards.
Starting at the top of the stud wall and again working out from the doorway, fix your first board. You will need to cut a 25mm strip from the edge which is above the door head member (as with fixing vertically). Repeat on the other side of the doorway and then measure, cut and fit the piece above the doorway.
Work along the top of the ceiling, right to the walls at each end. Now get ready to fix plasterboard to the lower section of stud wall. If you need to trim the boards to fit, make sure the cut edge is at the bottom so that it can be hidden behind the skirting boards later.


