Taking the time to install an outside tap makes great sense if you do a lot of gardening or even if you’d just prefer not to have a hose pipe trailing in through the kitchen window every time you want to wash the car. Although some might see this DIY job as being beyond their abilities, it is actually fairly straightforward as long as you follow the steps laid out in this guide.
Tools Required to Fit an Outside Tap
- Adjustable Spanners x 2
- Hacksaw or Pipe Cutter
- Hammer Drill
- Round/Half-Round File
- Tape Measure
- Spirit Level
- Exterior Filler
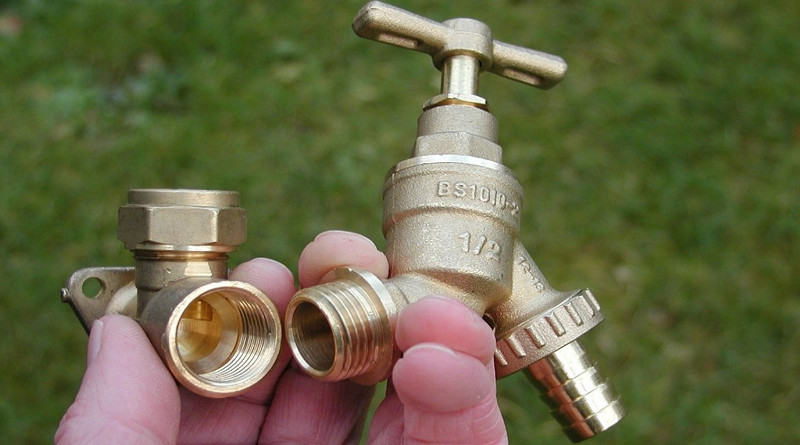
You will also need the plumbing fixtures, including An Angled Bib Tap, Wall Plate Elbow, 15mm Double Check Valve, at least 2 15mm Elbows, a length of 15mm Copper Pipe, a 15mm Equal Tee, Plastic Pipe Clips, and PTFE Tape.

Mark the Position of the Tap
Choose the position for the tap on the outside wall of the kitchen, close to the rising main under the kitchen sink (usually). You don’t want the tap positioned right in front of the rising main as this might make connecting the pipes awkward.
Ideally, the tap should be positioned about 500mm to the left or right of the rising main. You should also take into account the height of the tap. Make sure that a standard bucket will sit underneath it easily and that the tap will be above the damp-proof course.
- Mark where the tap will sit and then measure up 150mm to mark where the hole through the wall will go.
- If possible, measure up from there to the level of a window sill so that you can check the hole is not too high on the inside of the wall (you can use the inside of the same window sill to transfer the height onto the interior wall).
- The pipe hole should ideally enter the kitchen under the sink and be above the level of the stoptap on the rising main.
Note: You should tell your local water supply company before you install an outside tap, as there may be an additional charge on your water rates. Not all water companies require this, but it is worth a phone call to check.
Drill the Hole for the Tap Plumbing
If happy with the position of the tap (and it is worth double checking), drill the hole through the wall using a Hammer Drill fitted with a long, 20 mm wide masonry bit. You can then use the hole as a guide when fitting the new pipework and hopefully reduce the number of joints needed in the pipe. Remember that you want around 500mm between the rising main and the hole.

Joining a Branch Pipe to the Rising Main
1. Turn off the main stoptap and then turn on the kitchen cold tap to drain the pipe. Some pipes might have a drain valve above the stoptap. If so, hold a container underneath it and open it to drain the rising main. Mark the rising main level with the hole in the wall and use a hacksaw to cut out a 20mm section above that mark. File the cut ends to get rid of any burrs and square them off if needed.
Tip for Cutting Copper Pipe – Whenever you cut copper pipe, make sure you file the burrs off of the cut ends before sliding it into a fitting such as an Equal Tee.

2. Fit the cap nuts and olives from the Equal Tee over both cut ends (you can use clothes pegs or elastic bands to stop them from slipping down.) Insert the Tee into the gap with the horizontal branch facing towards the hole, slide the olives into place, and tighten the cap nuts by hand. Cut a short length of copper pipe (50mm) and fit this into the horizontal branch of the Tee. Then fit the Stop Tap onto the other end. The arrow mark on the stoptap, showing the direction of flow, should be pointing away from the rising main.
3. Tighten the compression joints of the equal tee and the stoptap with an adjustable spanner, and then close the newly fitted stoptap by turning the handle clockwise. At this point you are able to turn on the stoptap on the rising main to restore water to the rest of the household.
4. Cut another short section of copper pipe and connect it to the free end of the new stoptap. Connect the Double Check Valve to that copper pipe, making sure that the flow arrow is pointing away from the stop tap. The end of the check valve should now be close to the hole in the wall. Measure from the end of the check valve to the hole and cut a section of pipe to fit (allowing for the pipe fitting into the check valve and the subsequent joint).
5. Cut another length of pipe long slightly longer than is needed to pass through the wall and connect these two pieces of pipe with an Elbow Joint. Slide the pipe out through the wall and connect the free end to the check valve.
6. Go outside and use a hacksaw to trim off the protruding pipe so that about 25mm sticks out from the face of the wall. Connect a second elbow joint to this, pointing the free end downwards. Measure from the end of the elbow to the position of the tap and cut your final piece of copper pipe to this length. Connect this to the pipe fitting on the Wall-Plate Elbow, hold it loosely in place, and mark where the screw holes need to be on the wall.
7. Drill and plug holes for the screws to hold the wall-plate elbow and then connect the pipe and wall-plate elbow to the elbow protruding from the wall. Fix the wall plate elbow to the wall with appropriate screws.
Fitting the Outside Tap
With the pipework installed, you can attach the tap. The threaded tail of the Angled Bib Tap screws into the threaded end of the wall-plate elbow.
- Before you screw it in, wind PTFE tape around the thread to help create a water-tight fit.
- If the tap spout is not facing downwards when tightly screwed in, you will need to remove it and place a fibre washer inside the elbow joint and try again.
- Repeat this step with more washers until the tap spout points down and the tap is tightly screwed into the elbow joint.
- Open the new stoptap on the branch pipe and check for leaks in all of the new joints. Tighten any that need it.
Now turn on the new tap and check that water is flowing well. If all is well, you can fill the gap around the pipe passing through the wall with exterior filler or sealant.
Using a DIY Outside Tap Kit
If you like the idea of fitting an outside tap, but the thought of all the plumbing joints, elbows, valves, and stoptaps in this guide worries you, an alternative option is to buy a DIY Outside Tap Installation Kit![]() .
.
These kits commonly use a flexible hose instead of copper plumbing pipe, but you can buy kits that include pre-cut length of metal pipe. These will be more long-lasting but are harder to install in a tight space under your kitchen sink. It is important to choose a kit with a double check valve, so you avoid sitting water backing up into drinking water.
The easiest-to-use kits feature a self-cutting tap that can be screwed onto your existing pipes to create the junction. You can then simply drill a hole through the wall, connect everything up with the pipes provided, and screw the outside tap to the wall.


