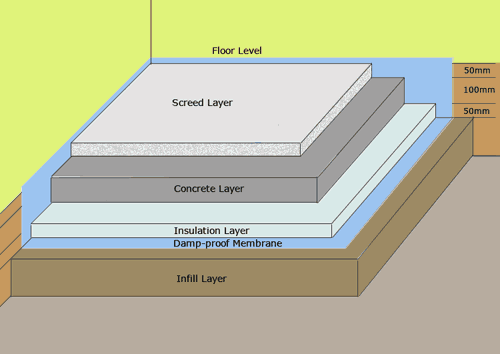
A rotten or damaged suspended timber floor, on the ground floor of a house, can usually be replaced with a solid concrete floor if you wish. However, you should always check with your local building control officer as this can affect the ventilation properties of the house. Additional insulation and waterproofing may also be required, so investigate carefully before going ahead.
A solidly laid concrete floor can make an old house feel a lot more sturdy, as well as providing better insulation than draughty floorboards. This is not a one-day job, even with help, so make sure you plan properly and allow for the room being out-of-bounds for several days or even weeks (to allow the concrete to dry properly).
Preparation
Your first task is to remove the existing suspended floorboards and joists. Remove all of the boards first and then saw through the joists and pull them out of the wall. It is also a good idea to remove the door and the skirting boards as these can get in the way later. Fill the holes left by the joists with trimmed bricks and mortar and allow the mortar to dry. It is then a good idea to treat the subfloor and walls below ground level with a strong chemical fungicide solution.
Materials Needed:
– Sand
– Cement
– Aggregate
– Infill Material (e.g. brick or tile rubble)
– Polythene Damp-proof Membrane
– Polystyrene Insulation Boards
– Bonding Agent
 Mark the wall with a levelled chalk line to indicate the finished floor level required. This should take into account the thickness of any floor covering you plan to use, such as tiles or wood blocks.
Measure down 50mm and make another chalk mark to indicate the layer of screed, taking the mark all the way around the room. A third mark 100mm further down the wall will show you the thickness of the concrete slab required. A final mark 50mm below that will give you the position of the insulation board you will usually need to install.
Anything below this final line can be filled with infill material.
The Infill Layer
For the infill, you should plan to use tile or brick rubble, or gravel rejects (coarse stones from quarry waste). Lay this down in layers of no more than 200mm before compacting it down and breaking up larger pieces with a sledgehammer. Be sure to pick any wood or metal out of the infill material as this can affect the concrete when it is laid.
Continue to add layers of compacted infill until you reach a level about 25mm below your lowest chalk line. Fill this last 25mm with a layer of sand, which should then be tamped flat.
Damp Proof Membrane
 Choose a 1000 or 1200 gauge damp-proof membrane and lay this carefully over the bed of sand. The edges need to be run up the wall to above the height of the finished floor level to form a tray. Fold the corners neatly and hold in place with paperclips or staples.
If your sheet of DPM is not large enough to cover the whole room in one, you will need to join two pieces together. Overlap by at least 200 mm and seal the join with waterproof tape.
Insulating a Concrete Floor
The insulation layer of your concrete floor is essential. It will help to stop cold rising up from the earth below, and will hopefully mean that you will not have to add an extra layer of thermal insulation on top of the finished concrete floor.
Lay polystyrene insulation boards on top of the DPM, making sure that they are fitted closely together and the joints are sealed with duct tape (or another strong type of tape). Take care to fit the insulation boards tightly against the walls and not to leave any gaps. Polystyrene insulation boards can be bought from any good DIY store or builder’s merchant.
Laying the Concrete
The concrete slab needs to be made from a medium-strength concrete mix. We suggest 1 part cement, 2 1/2 parts sand and 4 parts aggregate. Don’t add too much water as you want the mix to be fairly stiff. Start at the wall furthest away from the doorway and lay the concrete in strips across the room of no more than 600mm wide.
Level and tamp each strip down using a length of 100 x 50mm timber. The concrete should be level with the second chalk line you made on the wall. Work back towards the doorway one strip at a time, trying to keep the concrete flat and level. Check regularly using a spirit level held on top of the length of timber you are using to flatten the concrete.
Slight unevenness will be corrected by the screed layer, but try to get things as even as possible and fill any large dips and hollows as you go. Cover the damp concrete with a sheet of polythene and leave it to cure for at least three days.
Laying the Screed
Cut two 600mm long battens from 38 x 38mm timber. Make up a mix of screed mortar using 3 parts sharp sand, to 1 part Portland cement. Also mix up a solution of water, cement grout and PVA bonding agent in equal parts to form a creamy white paste. Dampen the concrete floor and paint a 600mm wide strip of this solution across the room, starting at the wall furthest from the door as before.
At either end of this 600mm wide strip, apply a bed of screed mortar and fix the 600mm battens you cut earlier into this bed. The battens should be running in the direction you are working and should be level with the chalk mark showing the finished floor level. Use a spirit level and straight edge to ensure the battens are level. The tops of these battens will be your guide to getting the screed flat and even.
Lay your screed in a 600mm strip between the two battens and use a length of 100 x 50mm timber to flatten and level the screed until it is flush with the battens. Finally, use a float to smooth the surface. When you are happy that the screed is flat, smooth and level, gently pull the battens out of their beds and fill the gaps they leave with screed mortar. Flatten and smooth these strips as before. Repeat this procedure over the full length of the room, 600mm at a time, until you reach the far wall. When the screed is firm, cover the whole floor with a sheet of polythene and leave to cure for at least a week.
Finishing Off the Floor
After a week the floor should be safe enough to walk on. Trim the damp-proof membrane so that it is about 25mm above the floor level and re-fit the skirting boards to hide the lip of the DPM. The floor will take at least 6 months to dry out completely, so do not fit any impermeable floor covering which will stop this process.


