Non-loadbearing Partition walls are usually constructed from wooden studs and plasterboard and, in many cases, you will not need to look for another solution. If, however, you are planning to build a partition wall on a solid concrete floor, it is worth considering using concrete blocks for the construction.
Solid block walls can offer better sound insulation than a standard stud partition wall would and will offer a more solid fixing for shelves, kitchen cabinets, etc. Solid block walls also have the advantage of being a much better barrier to fire.
Planning a Block Wall
As with any DIY project, planning and preparation are key to success. There are several things you will need to consider before you start to build your solid block wall.
Length – If the wall you are planning is longer than 6 metres, you will need to think about adding in a control joint. Control joints are joints without mortar (usually filled with exterior-grade sealant) which allow the wall to move and flex slightly with the natural settling of the house, helping to avoid cracks or breaks appearing. In a partition wall, the easiest place to have a control joint is around the doorway (if having one).
Openings – If you are going to have a doorway in your block partition wall, you should plan where it will be before you start to lay the blocks. If possible, plan the position of the doorway to avoid cutting too many blocks. A good way to do this is to lay out blocks on the floor without mortar. Remember that the doorway will have to be wide enough to allow for the wooden lining and door frame, as well as the door.
Block Wall Preparation
Because the new partition will not be tied into the walls at either end, you will need to fit metal connectors, known as Wall Profiles. These metal strips are fixed to the walls at either end of the new partition and give you something to attach the new wall onto.
Remove the skirting boards along each wall. Cut the metal connector to the correct length and fix it to the wall at the required position using 60mm screws. Use a plumb line to make sure that the metal connector is perfectly vertical. This will be your guide to help keep your new wall vertical, so taking a bit of extra time now will save time later.
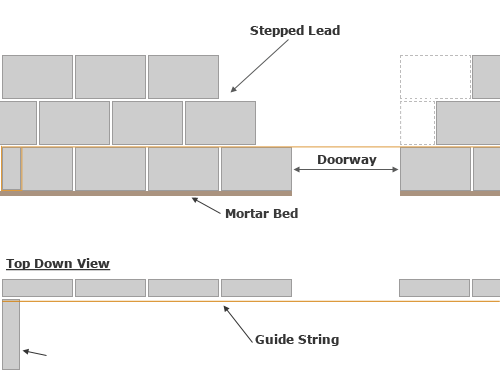
Tie string around a block, 10mm from the end, and place the block flat against the wall beside the metal connector. Stretch the string across the room to the other connector and tie the end around another block so that the string is taut. This will give you a guide to work along as you lay the first course of blocks onto the concrete floor.
Laying the First Course of Blocks
Lay down a bed of mortar for the first block using a standard mix of 1 part cement to 5 parts soft sand. Bed in the block and check that it is level and upright. Now continue to lay blocks, using the string as a guide, until you reach the position of your planned opening.
Now repeat this process from the opposite wall until you have a single course across the room. Before you lay the last block before the opening, check the width of the gap and trim the block if you need to.
Creating the Stepped Lead
You can now start to create your stepped lead. Fit a wall tie to the metal connector (wall profile) so that it will lay in the mortar of the second course. Cut a block in half and lay this as the first block in the second course.

Continue to lay blocks in this second course until you are half a block away from the opening. Repeat this on the other section of wall. The third course will then start with a full block (remember to add a wall tie again before you start) and should finish half a block back from the end of the previous course. This is your Stepped Lead.
Check that everything is still level and upright before filling in the leads to the edge of the opening. Remember that you will need to cut half blocks for every second course. Once three courses are complete, leave them to harden overnight.
You can then continue to lay courses, following the same technique, up to the height of the ceiling. If you are very lucky, the final course of blocks will sit 10mm from the ceiling and you will simply need to fill the gap with mortar. More likely, the gap will be an awkward size and will require you to either cut blocks to fit, or finish the top of the wall with bricks. Choose whichever method is easier for you.
Supporting the Doorway with a Lintel
You will need to support the blocks above the doorway with a precast concrete or steel lintel. When the walls on either side of the opening reach the height of the top of the doorway, take some time to measure and cut the blocks to allow for the lintel.
When measuring the height of the doorway, remember the door lining and frame which will be added later. Alternatively, cut the slot for the lintel to sit in with an Angle Grinder after the wall reaches a height slightly higher than the top of the doorway.
Joining Intersecting Block Walls
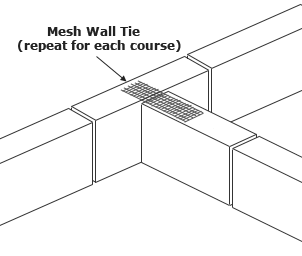
If you wish to build a second wall intersecting with the first, you can simply create a continuous vertical joint where the second wall butts up against the first.

To tie the walls together, use galvanised mesh or solid steel wall ties laid in the mortar of each course. This means the intersecting wall needs to be built (or at least partially built) at the same time as the main wall.
The Best Method for Cutting Blocks
If you need to cut a lot of blocks, it is worth investing in a Masonry Saw. Alternatively, you can cut blocks the old-fashioned way with a Bolster Chisel and Club Hammer. Score a line all the way around the block where you want the cut and then use the chisel and hammer to make a groove along the score line.
Repeat this process until you have a deep, even groove all the way around the block. Lay the block flat, place the chisel in the groove and give it a few hard blows with the hammer. The block should split cleanly along the groove. Always lay cut blocks with the cut face inwards towards the last full block.
Block Wall Building Tips
1. Do not dampen concrete blocks before applying mortar or laying them. Wet blocks may shrink and you risk the mortar joints cracking as the blocks dry out.
2. Make sure that the mortar joints are flush and not raked, particularly if you plan to plaster over the blocks.


