
Wallpapering is one of those jobs that, with the correct preparation, can be easier than it first seems. If you follow a few simple rules, it can be quite a straightforward job. This guide aims to help you learn how to hang wallpaper, including how to plan, prepare and then paper a room with as little fuss as possible. We will also look at some of the most common problems which can occur when wallpapering, and help you to avoid them.
How Much Wallpaper Will You Need?
There are several things you need to consider when estimating how much wallpaper you will need to finish a room, not just the length and width of the rolls you have chosen. For example, using patterned wallpaper can require more rolls because there will naturally be more waste as you match up the pattern.
A standard roll of wallpaper is 53cm wide and 10m long, so once you know the size of your room it is fairly easy to work out how many rolls you will need to finish it. But even if the wallpaper you are buying is not of a standard size, there is a simple way to calculate the total amount required.

Firstly, measure the height of the walls from skirting to ceiling (or bottom edge of the coving) and divide the length of the roll by this figure to see how many wall lengths you get from each roll. For example, if your room is 2.4 meters high, you will get four wall lengths from a standard 10m roll.
Now measure around the walls, minus the windows and doors, to see how many widths fit into the total length of the walls. So if your walls measure 12 meters in total and the wallpaper is 53cm wide, you need to divide 1200 by 53.
Finally, divide this figure (22.6) by the number of wall lengths in a roll and you will know how many rolls you will need to buy to complete the room. In this example, you will need 5.6 rolls to wallpaper the whole room. We would recommend buying seven rolls to account for mistakes and to allow for a trim margin.
If that all sounds too complicated, you can also use a wallpaper calculator to work out how much you need.
How to Choose Wallpapering Paste
There are several different types of wallpaper paste available, with most being sold as a powder or flakes which are mixed with water. You can also buy pre-mixed wallpapering paste, which is more expensive but can be easier to use as a beginner.
- All-Purpose Paste – As the name suggests, this is a general-purpose paste that is fine for hanging light to medium-weight wallpaper. If mixed with slightly less water, an all-purpose paste can be used to hang heavy paper.
- Heavy-Duty Paste – Designed to be used for heavy wallpaper such as embossed paper. Can also be used for paper-backed fabric and other heavy wallcoverings.
- Fungicidal Paste – Although most wallpaper paste contains some fungicidal additives, if you are hanging either washable wallpaper, vinyl, or foils it is worth getting proper fungicidal paste. If your room suffers from mould growth due to condensation, a fungicidal paste can really help to reduce the problem.
- Ready-Mixed Paste – Ready-mixed Thixotropic pastes are widely available and are used for hanging heavier-weight wallpaper. The pre-mixed paste is generally more expensive than powdered or flaked paste.
Tools You Will Need for Wallpapering
There are hundreds of specialist wallpapering tools available, but you will probably not need many of them for a standard wallpapering job. At the very least you will need:
- Bucket – A clean plastic bucket, used for holding wallpaper paste. Tie a length of string across the top, between the handle brackets, so you can rest your pasting brush on it.
- Craft Knife – A sharp craft knife is better for cutting heavy paper or vinyl than scissors. Remember to use with a metal straight edge.
- Metal Rule/Straight-edge – Make sure this is at least long enough to span the width of the paper.
- Pasting Brush – Your pasting brush should be at least 100mm wide and used only for pasting.
- Pasting Table – If you plan on doing a lot of wallpapering, a purpose-built pasting table is a great investment. You can pick up a brand new one for around £20.
You can find out more about the tools you might need when hanging wallpaper in our Wallpaper Tools Guide.

Preparation – Before You Start Hanging Wallpaper
Get everything ready that you will need for the job. Now measure the height of the room and add 100mm (4 inches) so you have a margin that can be trimmed later. Write the measurement somewhere you can easily see it (in case you forget).
If you are using heavily patterned wallpaper, it is a good idea to allow slightly more at the top and bottom to give yourself a better degree of adjustment. Cut your first four strips and lay them face down on the pasting table.
Make sure the surface you are wallpapering is clean and free from dust, holes, nails, etc., and that it is dry. If you are hanging paper on a newly plastered wall, ensure the plaster skim coat is completely dry before you start.
How to Paste the Wallpaper
Slapping on some wallpaper paste may seem like one of the easiest parts of the whole wallpapering process, but there are several things you can do to ensure things go smoothly when you come to hang the paper.
- Firstly, use a proper pasting brush and make sure the paste is well-mixed. Line the strip of wallpaper up with the far edge of the table to avoid getting paste on the surface which will then get onto the face of any subsequent sheets you lay down.
- Paste from the middle to the edge and brush out any lumps of paste as you notice them. With one half of the sheet pasted, pull it towards you to line up with the closest edge of the table and paste the other half of the sheet.
- To paste the end of the sheet hanging over the edge of the table, fold the pasted end over onto itself (but don’t press it down) and slide the paper along. Once the other end of the sheet is pasted, fold it in to almost meet the opposite end.
You now need to let the paste soak into the paper so move the pasted sheet out of the way. You can hang it over a broom handle laid across the backs of two chairs if you don’t want to lay it on a dust sheet. While the first sheet is soaking, you can paste a second sheet. Then, when hanging the first sheet, the second sheet will be soaking.
Where Should You Start Wallpapering?
The best place to start wallpapering a room can vary. If your room has a dominant feature (chimney breast, etc) start there. If starting on a chimney breast, measure it and mark a straight line down the centre with a pencil or chalk. Use this line as a straight edge for the first strip and work outwards.
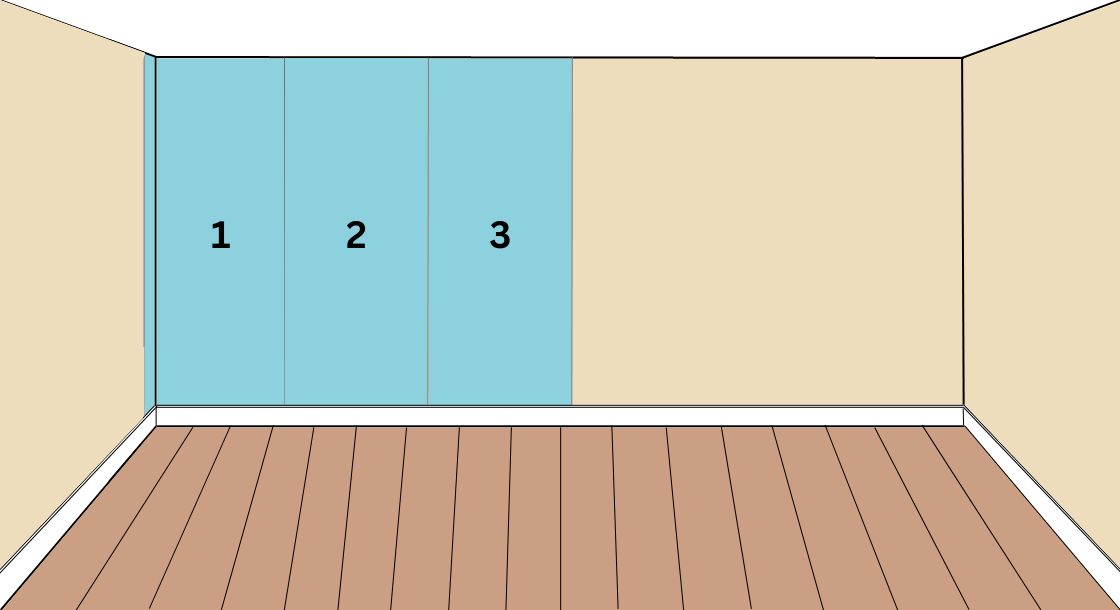
If the room has no dominant feature, start on the wall closest to the wall that contains the window. This will help reduce shadows being as visible if you have slight overlaps between strips of wallpaper. Start in the corner by measuring out by a distance equal to the width of the paper, minus 50mm, and use a plumb line to mark the wall. The first strip should be placed on that line, so it overlaps around the internal corner and onto the window wall by 50mm.
Hanging the First Sheet of Wallpaper
- Carry the folded strip over to the wall, climb your steps, and allow the paper to unfold. Hold the top of the strip to the wall, allowing for your 50mm overlap.
- Slide the paper across the wall until in line with your vertical mark. When it is aligned, use a paper-hanging brush to smooth the paper onto the wall.
- Start by running down the centre, and then out to the edges to get rid of any bubbles.
- Crease the paper into the angle between the wall and ceiling and then peel the paper gently away from the wall. Trim along the crease with sharp scissors or a trimming knife and then brush the trimmed edges back into place.
- Repeat this process at the bottom of the wall where the wallpaper meets the skirting board.
You now simply have to repeat this process, using the edge of the previous strip to align the next. Slide the new strip to butt up against the previous one and gently use a seam roller to make sure the edges are firmly stuck down.
Wallpapering Around Corners
Internal Corners:
- When you reach a corner, measure from the edge of the last full strip of wallpaper to the angle of the corner, and add 10-15mm to the measurement.
- Mark the width onto the next sheet of wallpaper and trim off the excess, keeping the offcut. Paste the paper onto the wall and brush it carefully into the corner.
- Measure the width of the offcut and measure that distance from the corner on the new wall. Use a plumb line to mark a straight line at that distance to use it as a guide.
- Paste the offcut on the inside of the line, into the corner. This thin strip will overlap the 15mm overlap on the last sheet before the corner. This might seem a complicated method, but it usually creates a better corner than trying to paste a full sheet into the corner in one piece.
External Corners:
- Paper the wall leading up to the corner until there is a gap of less than one full sheet. Measure the gap between the last full sheet and the angle of the corner, then add 25mm to the measurement.
- Mark and cut the next strip of wallpaper to the measurement you just made. Paste it into place and fold the small overhang around the corner.
- Now paste the offcut up against the edge of the overlap on the new wall, butting it up just as you would when adding a full sheet of wallpaper.
You can then continue wallpapering until you reach another corner or finish the room.
Door and Windows
When you reach a doorframe, press the paper into the angle between the wall and architrave (wooden surround of a doorframe) and use the blunt edge of a pair of scissors to get a nice clean crease.
Pull the paper away from the wall slightly and trim the excess. Brush the trimmed paper back into place.
When papering around windows, it doesn’t look like there is enough paper to go round. The secret is to cut two patches for the top corners of the window recess. Apply these after you’ve covered the sides of the recess.
How to Avoid Wallpapering Problems
Wallpapering is at times a tricky job, especially if you don’t understand the common problems which can occur without the proper preparation and planning. These tips should help you diagnose and fix many of the most common wallpapering problems and will help you to avoid them in the future.
Paper Tearing
If the wallpaper is tearing when you try to pick it up to apply to the wall, or even when it is attached to the wall, you have probably used too much paste or the paste is too thin. Thicken up the paste and apply less to stop this from happening. If the paper is tearing whilst cutting, check that your scissors or knife is sharp.
White Seams Visible
If, after applying the wallpaper, white seams or lines are showing between the sheets, you have either not butted the sheets together properly or the paper has shrunk as it has dried. Make sure sheets are butted together properly and roll the seam with a Seam Roller. Lining the wall with lining paper will also help stop this problem. It is also important to let the paste soak into the paper properly before hanging.
Bubbles in the Paper
The occasional bubble in wallpaper is hard to avoid, but if you are seeing lots of bubbles, you are doing something wrong. To Prevent bubbles, check that you are not using too much paste and that the paste you do use is evenly spread. Also, make sure you have allowed the paste to soak in properly. To remove bubbles in the paper that has already been hung, pierce with a knife and allow excess paste to escape. If the bubble is air, pierce and flatten, brushing over with a small amount of paste on a brush. Sponge this down after a short while to finish.
Creases in the Paper
Creases sometimes occur when hanging paper around or into a corner. Small creases can be treated like bubbles (see above).
Papered Seams Lifting
Often caused by simply not applying paste right to the edges of the paper. If you did not line the walls before papering, you might also find that some of the seams lift slightly. To fix this problem, peel the seam back slightly and apply the paste to the underside of the paper with a small brush (artist’s brush or similar). Press the seam back in place and roll with a Seam Roller. Wipe the seam with a sponge to remove any paste from the surface of the paper. As a rule, it is always better to line your walls before papering.
Wallpaper Sheets Lifting
Again, this could be because you did not line the wall. It could also be caused by the residue of distemper (an element found in some paints). If you think this might be the problem, remove the paper from the affected area and wash the wall well. Allow it to dry and then rehang the paper.


